Friday, October 1, 2021

ISQL - Query, Manage any ODBC based data source

Open Database Connectivity or ODBC is a part of the windows OS that enables accessing data from different data sources using a single interface. For example, RDBMS such as Access, SQL Server, Oracle, text files, excel files etc. using Structured Query Language or SQL.

There are no tools available by the OS to query using SQL hence ISQL.exe was created.


It has following features:
  • The user interface has a single SQL command window where sql commands can be entered and executed.
  • If the sql command ends with a ; , the results of the view are posted to a common view window.
  • If the sql command ends with a :, the results of the view are posted to a new view window also additional rows can be fetched.
  • The view windows can be tiled vertically or horizontally
  • The SQL Commands in the SQL command window can be  saved to a text file and loaded.
  • A new view window containing results of sql query is created depending on the command.
  • VSQL.INI is used for data keeping.
Example
ROSE perf numbers.xls contains multiple worksheets such as job, final. An ODBC data source can be created and data can be queried using SQL commands below.
Operation
Launch ISQL tool. Click ... button to create Excel Data source.

 
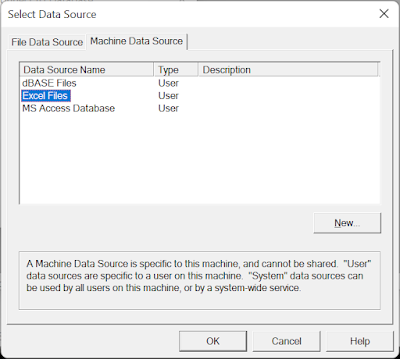
Select Machine data Source, Select Excel driver and Click New button. 


Using the wizard create the DSN.

Select Excel driver

Complete creation by entering  a  name for dsn.


Click Select workbook and select a excel worksheet.


Execute following commands
select * from [job$]:
select * from [final$]:


The output looks like as below


Source and Binaries can be found here.


Wednesday, September 29, 2021

Transform COM+ serviced component to WCF Service

With the advent of WCF, there is a paradigm shift in developing applications interacting across network. However porting existing COM based applications to WCF architecture can be daunting task. A balance can be achieved by deploying existing COM based applications as a WCF service so that it can be accessed by WCF clients.

Any COM component can be simply made as a WCF service using he LBGenrator.Following defines the process.
1.      Select COM components as described in DCOM Client
2.      Navigate to WCF Server tab, enter a namespace for the generated wrapper class
3.      The Generate Code option does following
a.       Scan through the selected COM objects and generate an Interface for each
b.      A project is created containing a COM object COM_LB_<prog id> that implements ServicedComponent and the interface
c.       This project is compiled and wcfserver.dll is generated and copied to wcfserver.dll

Example
As described in the previous post, use sillycalc.wsc. Copy the code and save it to sillycalc.wsc and register it.
Load the WCF component in a COM+ Application as discussed in the previous post.


Load  the wsc file as shown below and generate wcfserver.dll from WCF Server tab. This contains a COM class implementing wcf service. wcfserver.COM_LB_SillyCalc_WSC_1. 
Copy wcfserver.dll from the output folder and Execute following command to deploy  WCF service.

ComAppHelper -ins -app:wcfcalc  -gac -runforever -svc  D:\Github\TechBlog\COM+\WSC\wcf_client\wcfserver.dll


WCF Client

Create a console project and add a service reference for address net.pipe://localhost/wcfcalc/wcfserver.COM_LB_SillyCalc_WSC_1/mex


The app.config needs be edited to comment as below:
       
	   
<!--
<identity>
<userPrincipalName value="VEDAVYASARAO\rvvya" />
</identity>
-->


Consume the service as below
       
	   
static void Main(string[] args)
{
    var x = new ServiceReference1.SillyCalc_WSC_1Client();
    Console.WriteLine("calling x.add(10, 2) Result:{0}", x.add(10, 2));
    Console.ReadKey();
}


Result


Adding a  different service endpoints to WCF service
Currently the installer deploys a named pipes endpoint. Additional endpoint such as net.tcp can be easily added using “SCConfiguration Editor”(svcConfigEditor.exe ) as shown below.

  1.         Open the COM+ application from File->Open->COM+ Application.
  2.         Select WCFCalc Application

.     


   3      3. Add a new service point as shown below.


Similarly Managed COM component CalcServer.Calucalator, hosted in a COM+ application can be utilized as  a WCF service.


Source and Binaries can be found here.


Monday, September 13, 2021

Working with Managed COM Component

COM components can also be generated under .net environment using Visual studio and languages such as C#.

A COM component is essentially class library having an interface declared as below.

    [ComVisible(true)]
    [Guid("E3D02A14-ED36-471E-BE32-2D65F1BC97DA")]
    public interface ICalucalator
    {
        int add(int op1, int op2);
    }
and class implementation as below. TheComvisible attribute makes the class visible to COM based clients and the guid serves as clsid. The class name serves as the second parts of the program id. for example, servercalc.calucalator.
    [ComVisible(true)]
    [Guid("0AD70785-5539-4EE0-83D5-37A62CF5318F")]
    public class Calucalator :  ICalucalator
    {

        public int add(int op1, int op2)
        {
            return op1 + op2;
        }
      
    } 
AssemblyInfo.cs should look as below. The Comvisible attribute makes the class visible to COM based clients and the guid identifies the  typelib.  A typelib contains metadata about the classes, interfaces, methods within the assembly. It will be used com based clients to make calls.
// Setting ComVisible to false makes the types in this assembly not visible 
// to COM components.  If you need to access a type in this assembly from 
// COM, set the ComVisible attribute to true on that type.
[assembly: ComVisible(true)]

// The following GUID is for the ID of the typelib if this project is exposed to COM
[assembly: Guid("8CF1D751-666D-40C6-A741-0C14B4727A9E")]
the project file .csproj should look as below. The assembly name serves as the first part of the program id. for example, servercalc.calucalator. The registerforInterop executes RegAsm for the assembly making it visible for  COM clients.
<AssemblyName>CalcServer</AssemblyName>
<RegisterForComInterop>true</RegisterForComInterop>

Note:- All the guids must be unique. if the same project is  cloned they must be replaced apart from the code 

Registration
The assembly must be registered. it's done Regasm tool as below. Note that a typelibrary is also generated.

regasm D:\Github\TechBlog\COM+\Managed\server\bin\CalcServer.dll /tlb:D:\Github\TechBlog\COM+\Managed\server\bin\CalcServer.tlb

Com callable wrappers are used to consume managed com components from native clients. The process involves creating the type library from the managed dll by using tlbexp.exe and import it. Later native clients query type library for published interfaces to make calls. 

Serviced Component
COM+ offers services such as object pooling. A Serviced component can take advantage of this by deriving from System.EnterpriseServices.ServicedComponent class.
    public class Calucalator : System.EnterpriseServices.ServicedComponent, ICalucalator
This enable overriding the default methods such as object pooling with custom code.


Scripting host Client
The component can be consumed by a scripting host client such as cscript or wscript as below. Save the 
Save the following to calcserver_client.vbs.
       
 set calc = createobject("CalcServer.Calucalator")
 msgbox calc.add(40,6)
 
 
Execute it in a WOW64 command window. The message box should popup as shown below


C# client
Unlike unmanaged com component, managed com component cannot be consumed by importing typelibrary in a managed client. It needs to be hard coded as below. 

       
static void Main(string[] args)
{
    dynamic remoteobj = Activator.CreateInstance(Type.GetTypeFromProgID("CalcServer.Calucalator"));
    Console.WriteLine("40+6={0}", remoteobj.add(40, 6));
}
 
 
The output looks as below:

Debugging scripting component
It's possible to debug Managed Com Component at run time using Visual Studio as below.
1. Start the client
2. Load the symbols for the managed com component

3.step into the managed component  implementation


Source and Binaries can be found here.


Thursday, September 2, 2021

Working with WSC (Windows scripting component)

Often times an application require a certain functionality to be extended by users .For example a workflow engine can let users customize start or end steps. The .NET framework provides perfect mechanism to implement this but it comes with a steep leaning curve.

Windows scripting component or WSC provide an easier javascript or vscript based solution for creating COM components  using command line tools. WSC are essentially XML based  that can be used to generate COM based object that can even support events.
What's more interesting is it's possible to host these in COM+ applications for remote access and integrated as a WCF service.

Below is a simple example. This hosts a single component that has a single method Add.
<?xml version="1.0"?>
<component>

<?component error="true" debug="true"?>

<registration
 description="silly calculator"
 progid="SillyCalc.WSC"
 version="1"
 classid="{502B2117-D5AC-41B2-9441-B466932F613F}"
>
</registration>

<public>
 <method name="add" >
 <PARAMETER  name="op1" />
 <PARAMETER  name="op2" />
 </method >
</public>

<script language="VBScript">
<![CDATA[


Function add(op1, op2)
add=op1 + op2
End Function 


]]>
</script>

</component>

The window scripting component wizard can also be used for creating wscs. It can be installed by running wz10en.exe.

Registration
  1. Save the above text to file sillycalc.wsc
  2. open a WOW64 command window and run following command.
regsvr32 sillycalc.wsc

Scripting host Client
The component can be consumed by a scripting host client such as cscript or script as below. Save the following to sillycalc_client.vbs and execute it in a WOW64 command window. The message box should popup as shown below. 
       
        set calc = createobject("sillycalc.wsc")
	msgbox calc.add(40,6)


C# client with WSC unregistered
The wsc can be consumed directly by a c# client without even registering as below:
   dynamic remoteobj;
   remoteobj = (dynamic)Marshal.BindToMoniker(@"script:D:\Github\TechBlog\COM+\WSC\server\SillyCalc2.wsc");
   Console.WriteLine("40+6={0}", remoteobj.add(40,6));
       
 
However this requires hardcoding the method names and its parameters which can be problematic to maintain.

C# client with WSC registered
CLR uses Runtime callable wrapper to consume unmanaged COM components. 
The process involves generating an interop dll from the type library of  the unmanaged COM dll usng tlbimp.exe and adding it as a reference to the project. Alternatively this can be done by adding tlb as a reference.
However this method does not work for wsc tlb files as Visual studio does not interpret wsc tlb files.
The when wsc is registered, it can be consumed by a c# client  by hard coding method name as below. also this needs to be executed in WOW64 command window.
       
 dynamic remoteobj;
 remoteobj=(dynamic)Activator.CreateInstance(Type.GetTypeFromProgID("SillyCalc.WSC.1"));
 Console.WriteLine("40+6={0}", remoteobj.add(40, 6));


The output should like below:

Debugging scripting component
It's possible to debug WSCs at run time using Visual Studio as below.

CSCRIPT //X  calc_client.vbs

This will  launch JIT debugger and source code is loaded into it.
stepping into the wsc method will load the source code of the wsc as below

Note:- The wsc file should explicitly allow debugging as below.

<?component error="true" debug="true"?> 

Source and Binaries can be found here.


Monday, August 23, 2021

Late Binding Client Code Generator for COM Components

Let's suppose you have a C# class that acts as a server and you need clients to consume it across network.
There are two options:
  1. DCOM via COM+
  2. WCF
Presently .NET framework provides RCW (Remote callable wrapper) mechanism for .NET code to interface with COM components. However it does not support late binding and has following limitations notably:
  1. Early bound requires tlb or dll to be part of the project for unmanaged dlls
  2. Managed com dlls cannot be consumed using tlb by managed client
  3. Don't support  remote activation to work across network.
Late Binding Client Code Generator tries to address as below:
  • Generate C# based late binding client code 
  • Generate VBScript based late binding client code 
  • Generate remote registration files
  • Supports .Net framework 3.5
  • Generate code that can be deployed as a WCF Server using COM+ Integration
  • Generate code to start and stop COM+ application
Example
WSC COM component
As described in the previous post, use sillycalc.wsc. Load  the wsc file as shown below and generate the wrapper code.


COM+ services offers features such as thread pooling, object pooling, just in time activation, security etc. These services can be availed by hosting COM components in a COM+ application.
This also allows the COM component to be consumed across the network using DCOM.

Add the component in a COM+ application by executing the command

ComAppHelper.exe  -ins -app:testcalc -reg  D:\Github\TechBlog\COM+\WSC\server\sillycalc.wsc

This will create a COM+ application called calctest and hosts SillyCalc.WSC  as shown below

C# client
The outputfile.cs contains a class COM_LB_SillyCalc_WSC_1 which can be instantiated to create a proxy for the server. This class also contains wrapper code for calling the methods and properties defined in the server.
Below is an example:
       
class Program
{
        public static void Main()
        {
            var lbclient = new COM_LB_SillyCalc_WSC_1("127.0.0.1");
            Console.WriteLine("40+6={0}", lbclient.add(40, 6));
        }
}	


The output

VBScript client
outputfile.vbs contains a class COM_LB_SillyCalc_WSC_1 which can be instantiated to create a proxy for the server. This class also contains wrapper code for calling the methods and properties defined in the server.
Add following at the bottom of outputfile.vbs, Edit add function to remove set.
       
	   
set x = new COM_LB_SillyCalc_WSC_1
x.createcomobject("127.0.0.1")
msgbox (x.add(10,2))


Execute as shown below:
cscript  outputfile.vbs

The output


Managed COM component
As described in the previous post, use CalcServer.Calucalator. Load  the dll file as shown below and generate the wrapper code.


Add the component in a COM+ application by executing the command:

ComAppHelper.exe -ins -app:calctest  -reg -runforever  D:\Github\TechBlog\COM+\Managed\server\bin\CalcServer.dll

This will create a COM+ application called calctest and hosts CalcServer.dll as shown below

C# client
The outputfile.cs contains a class COM_LB_CalcServer_Calucalator which can be instantiated to create a proxy for the server. This class also contains wrapper code for calling the methods and properties defined in the server.
Below is an example:
       
	   
class Program
{
        public static void Main()
        {
            var lbclient = new                     COM_LB_CalcServer_Calucalator("127.0.0.1");
            Console.WriteLine("40+6={0}", lbclient.add(40, 6));
        }
}


The output

VBScript client
outputfile.vbs contains a class COM_LB_CalcServer_Calucalator which can be instantiated to create a proxy for the server. This class also contains wrapper code for calling the methods and properties defined in the server.
Add following at the bottom of outputfile.vbs, Edit add function to remove set.
       
	   
set remoteclient = new COM_LB_CalcServer_Calucalator
remoteclient.CreateComObject "127.0.0.1"
msgbox remoteclient.add(10,2)


Execute as shown below:
cscript  outputfile.vbs

The output

Debugging a Component in COM+ Application
To debug, simply attach to the dllhost process in visual studio. 


Make sure correct pdb files are copied.

Set breakpoint and debugger breaks.


Source and Binaries can be found here.


Monday, August 9, 2021

APITester - Test any COM component using its typelibrary


 COM components are often used in backend, require elaborate workflows, complex GUIs. For ad hoc testing at for example customer site with specific inputs, separate test application needs to be created.

APITester tries to solve this problem, It reads the typelibrary and presents a simple user interface that lists  exposed apis and their parameters as shown below.  Further more the executed functions are saved and restored reducing the burden of reentering details. Also the logging shows previously executed apis.


components can be selected from COM+ application as shown below.

 or manually from typelibrary as below

After selecting the component the drop down lists all possible APIS. For VARIANT data types, a specific data type can be selected from the dropdown list. Data can be entered in the value column.

Upon executing by clicking ! button, the results are added to the log.

The source and executables can be found here.

Note:- 
TLILib.dll is used for reading typelibrarry. it should be registered on the machine where used.
MSFLEXGRID.OCX  is used for presentation and inputs. it should be registered on the machine where used.

Source and Binaries can be found here.


Sunday, August 1, 2021

Enabling Bitlocker with pre-provisioned Encryption in the installers.


In a regulated environments data theft  can be a costly an ordeal. Disk encryption helps to safeguard the data when it reaches wrong hands.
In Windows environment, bitlocker enables full volume encryption. When coupled with TPM, it's almost ensured that the data will be accessible on the same hardware.

Overview of TPM

  • Trusted Platform Module (TPM) is a cryptographic coprocessor embedded in the motherboard
  • TPM can be used for public key cryptography and also perform system integrity checks on critical early boot components.
  • TPM comes with Endorsement Key (EK) preconfigured by the hardware manufacturer.
  • When the TPM is owned with a secret password,  Storage Root Key (SRK) is generated and is encrypted by EK.
  • TPM collects and stores measurements from multiple early boot components and boot configuration data to create a system identifier in a 160-bit platform configuration register (PCR).
  • Win32_TPM WMI interface can be used to interact with TPM programmatically.

Overview of Bitlocker

  • Bitlocker was introduced in Vista; it can be used for full volume encryption (FVE) of the OS (C:) and Data volumes ( D: )
  • The BitLocker filter driver (Fvevol.sys), performs on-the-fly encryption and decryption of the volume.
  • The volume is encrypted with a full-volume encryption key (FVEK)
  • In turn, the FVEK is encrypted with a volume master key (VMK) and stored in a special metadata region of the volume.
  • Win32_EncryptedVolume WMI interface can be used to interact with bitlocker programmatically. Alternatively, manage-bde tool can also be used.

How does it work?

When bitlocker is used with TPM, the VMK is Sealed. When Sealed, the VMK is protected in two folds:
  1. VMK is encrypted by SRK.
  2. The measurements from multiple early boot components and boot configuration data are checked against tampering during boot.(However, the measurements are reset when the machine is powered off and then powered on.)

As OS volume (C:) is also encrypted, an additional primary partition, at least 100 MB in size and unencrypted needs to be created to store boot records and boot time system files.

Encryption is highly time consuming and requires several hours to encrypt a volume with data. Therefore, encryption is usually pre-provisioned on an empty hard disk. Alternatively it can be done passively when the system is idle as discussed here.

Deployment overview

A typical installation consists of three stages. For simplicity a new installation assumed. 

Stage 1: Configure TPM in BIOS
If the TPM is disabled in the BIOS, it needs to be enabled manually in the BIOS. It's necessary since when TPM is disabled, it's completely cut off from the OS and hence it cannot be manipulated programmatically in the next stage.

Stage 2: WinPE
The installation is kicked off by booting from WinPE via an USB drive. The WinPE should be version 3(Windows 8) and above to take advantage of "used" option during encryption. This stage has following steps.

Configure TPM's state
The first step is to set TPM's state to Enabled, Activated and Disowned.
If the TPM was previously owned and password is lost, it should be cleared first.
This process involves a reboot and the user needs to acknowledge a BIOS warning indicating clearing of TPM by typing  F12 key on the keyboard.

TPM's states can be altered programmatically. The following pseudo code should help.
       
if  isEnabled=false and isActivated = FALSE and isOwned  = FALSE then
  required_action = 10
else if isEnabled=FALSE and isActivated = FALSE and isOwned = TRUE then
  required_action = 6
else if isEnabled=TRUE and isActivated = TRUE and isOwned = FALSE then
  required_action = 8 
else if isEnabled=TRUE and isActivated = TRUE and IsisOwned = TRUE then
  required_action = 14
else
  Wscript.echo "TPM is in incorrect state. Check and correct it in BIOS"
  required_action = 0
end if

 retval = SetPhysicalPresenceRequest(required_action)
 if retval <> 0 then 
  Wscript.echo "SetPhysicalPresenceRequest action has failed"
  exit function
 end if
 retval = wmiObject.GetPhysicalPresenceTransition  (transition)
 if retval <> 0 then 
  Wscript.echo "GetPhysicalPresenceTransition query has failed"
  exit function
 end if

 ' 0= no action 1= warm restart 2=cold restart
 if transition = 1 or transition = 2 then 
  wscript.echo "GetPhysicalPresencetransitionsition returned value" & transition
  exit function
 end if


Create volumes
This step will first create volumes. As discussed, a dedicated primary partition of 100 MB or more is required. Following is an example.

Primary Partition 1
Volume 1
Name: Bitlocker  Drive: P Purpose: Store Boot records and system files

Primary Partition 2
Volume 1
Name:System Drive:Q Purpose:Store Application OS + Application Software

Primary Partition 3
Volume 1
Name:Data Drive:R Purpose:Store Application Data

Encrypt volumes
This step will encrypt volumes System and Data using manage-BDE tool as below:
manage-bde -on Q: -used 
manage-bde -on R: -used 

Load WIM image
This step will load Wim image to the System volume.
dism /apply-image /imagefile:installer.wim /index:1 /applydir:q:\

Add Boot record
This step will add boot records and system files to the Bitlocker volume.
bcdboot q:\windows /s p:

Stage 3: Application Installation
In this stage, the custom OS and the application gets installed. The following steps needs to be performed.

Own TPM
Note the following applies for Windows 7 OS or previous only. In Windows 10 and above, TPM is automatically owned by the OS so there is no need to take ownership.
In this step, the TPM is owned and this will generate a new SRK that will be used for encrypting VMKs. I the TPM is in Disowned state, the ownership can be acquired by calling "TakeOwnership" API. Otherwise "ChangeOwnerAuth" API needs to be called.

Add Protectors
In this step,  the System volume is added with  TPM protector
MANAGE-BDE -protectors -add c: -tpm
MANAGE-BDE -on c:
The Data volume is then added with an Autounlock protector.
MANAGEBDE -autounlock  d: -enable
MANAGE-BDE -on d:

Backup Recovery keys
In this step,  The recovery keys will be stored to an USB drive. Whenever TPM detects a system tampering, the OS will demand recovery keys during the boot.
In the case below, the usb drive is f: and the recvoery keys will be stored there.
manage-bde -protectors -add c: -rk f:
manage-bde -protectors -get d: -sek f:

Source and Binaries can be found here.